Using Filezilla FTP Program
The software page under "Syllabus" tells you where to get the program. Please be sure that you get the FTP Client program and NOT the Server Administrator Program. Also, there are now different versions of the program. One is free, and the others have more features, but you have to pay for them. Take care to select the version that you want. The free version works, so you don't have to pay any money unless you choose to.
You can use Filezilla FTP program to upload your new Web page to your site on the student server. Filezilla is fairly easy to use. Here is a link to a tutorial on it.
https://wiki.filezilla-project.org/Using
When you use any FTP program, you have to know
- the host address of the server that you want to upload to,
- your username and
- your password
Here is the information you'll need for the student server at Palomar.
- Host Address: GCMW177.palomar.edu
- Username: Your username is similar to your Palomar email address. There is one small addition. Start with your email address, and insert "gcmw177" right after the "@" symbol. Here is an example:
Email Address: jdoe1234@student.palomar.edu
Username: jdoe1234@gcmw177.student.palomar.edu - Password: Use your student eServices/MyPalomar password
- Default Remote Directory: Your email address name with a slash in front of it. Example: If your email address is jdoe1234@student.palomar.edu, your Default Remote Directory will be "/jdoe1234". Don't forget the slash.
Setup in Filezilla
After you install the program and open it, your first screen should look something like this:
- Click on "File," and then on Site Manager.
- The site manager screen comes up. If you have already set up some sites, they will be listed. If the program is brand new, you won't see any sites listed.
- Click on the "New Site" button in the bottom left section of the dialog box.
- Here is what a sample setup window looks like after I have filled out the information:
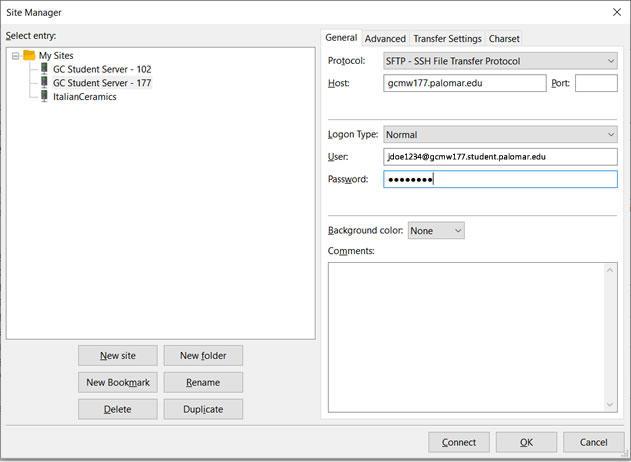
- Site Name: Under "My Sites" on the left, you will be able to edit the site name of the new site. I used "GC Student Server - 177."
- Protocol: On the right, choose the "SFTP - SSH File Transfer Protocol" option from the drop down menu.
- Host: "gcmw177.palomar.edu
- Logon Type: Normal
- User: Type in your username. See above for how you determine your usename.
- Password: Type in your eServices password.
Setting Up the Default Local and Remote Directories
To let Filezilla know where your files are on your computer and the remote server, follow this procedure.
- Click on the "Advanced" tab on the top right.
- Be sure that your GCMW Student Server - 177 site is still selected on the left.
- Click on the "Browse" button on the right. Navigate to the folder on your computer that you setup for your class files and select it.
- Under "Default remote directory" type a slash + your email address name. (Example: /jdoe1234/). Be sure not to forget the "/" 's at the beginning. No spaces.
- Click "OK" at the bottom to save your site setup.
Setting Up the Waiting Time Between Connection Attempts
Our student server has a built-in security function that does not allow rapid attempts to login to an account. This prevents automated attempts to break into the server. If there are 7 unsuccessful login attempts within 2 minutes, your account will be suspended, and only the server administrator can reset it.
The default settings in Filezilla have Filezilla repeat attempts to login at 2 second intervals. Therefore, if something is not entered correctly in your site setup, or if your eservices password changes during the semester and you forget to change it in Filezilla, you will have an unsuccessful attempt to connect. Filezilla will repeat sending this information every 2 seconds and your account will be suspended. To prevent this from happening, we have to change one of the settings in Filezilla.
- With Filezila open go to Edit -> Settings. You will see the dialog box pictured below.
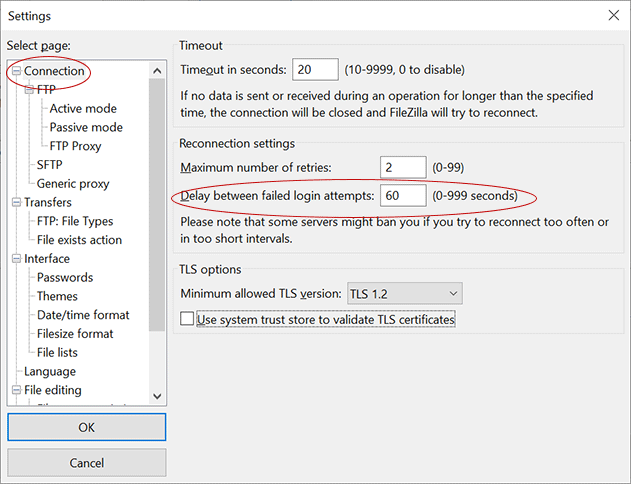
- Make sure that "Connection" is selected on the left.
- Set the maximum number of retries to 2 or less.
- Then, next to "Delay between failed login attempts;" type "60" (without the quotes.)
- Click the "OK" button.
This will prevent Filezilla from making too many unsuccessful login attempts within 2 minutes.
Uploading the Files
To Upload:
- Open Filezilla
- Click on File -> Site Manager
- Select your GC Student Server - 177 site
- Click the "Connect" button at the lower right. You will be connected to the server.
When you upload, be sure to upload files that are in your GCMW177 folder. DO NOT upload the folder itself. In order to do this, you have to connect to the site. Then, on the Local Files side, you will see your GCMW177 folder. Click on the folder to open it. You'll see it's contents in the lower pane on the local side. You should see the index.html file and an images folder. Please see my screen shot below.
I have outlined a few things in red to call attention to them. You can see my Local Site on the left and my Remote site on the right. In my local site, I've navigated to my GCMW177 folder. I've opened it. In the pane below, you can see the contents of the GCMW177 folder.
In the lower pane, I've selected the files that I want to upload to the server. They are highlighted in blue.
Now, I can right/control click on the highlighted files and select "Upload" from the context menu. See the screen shot below. The files have now been uploaded to the remote server. Note that the GCMW177 folder is not present on the remote server, but the index.html file and images folder are both there.